
Rotation Table
On this page
The Rotation Table settings panel lets you connect and control a motorized turntable for automated polar measurements. Once connected, the table integrates with the IR Management window to drive the auto-scan feature, which rotates the speaker and captures impulse responses at each angle without any manual intervention.
Requires a valid LinFIR license. All rotation table features — connection, manual jog controls, position dial, and auto-scan — are available to license holders only. Without a valid license the Settings → Rotation Table tab is displayed grayed out.
Supported Hardware
LinFIR supports two families of rotation table controllers:
| Controller | Interface | Detection | Example hardware |
|---|---|---|---|
| Pololu Tic (T500, T834, T825, T249, 36v4) | USB (native) | Automatic via USB VID/PID | Any stepper with a Tic controller |
| GRBL (Arduino) | USB-serial | Serial port enumeration | Audiomatica Medusa, DIY Arduino build |
Pololu Tic controllers are identified automatically by their USB vendor ID. GRBL boards appear as serial ports; LinFIR probes them with a status query to confirm the firmware.
Accessing the Settings
Open Edit → Settings (or Cmd+, / Ctrl+,) and select the Rotation Table tab.
Connecting a Table
1. Port and Baud Rate
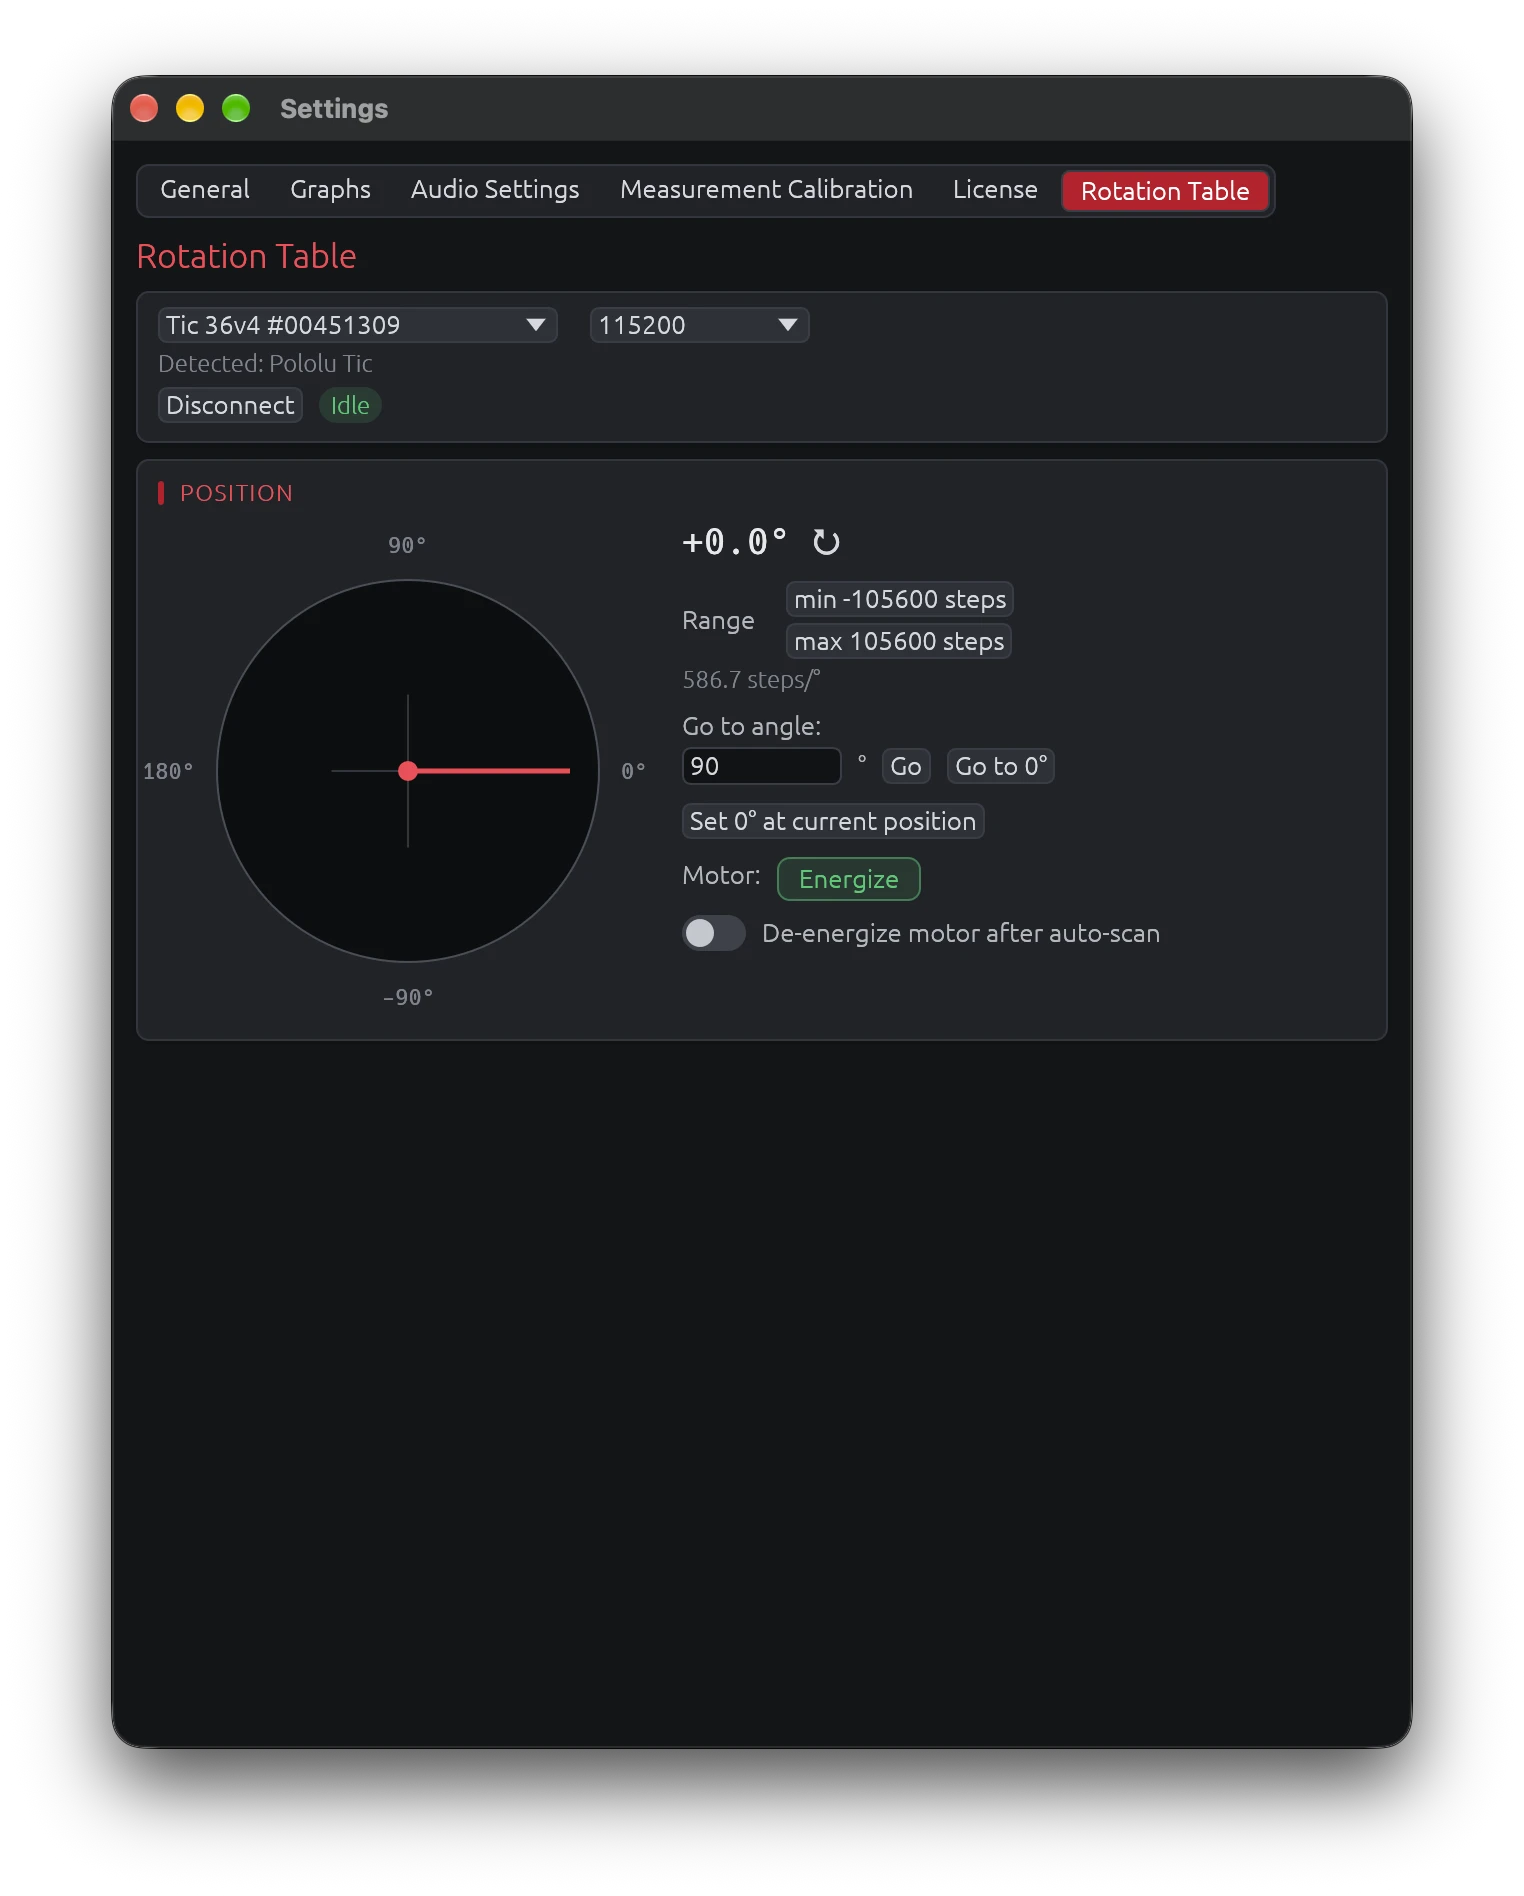
LinFIR scans available ports each time the settings panel is drawn. Use the port combobox to select the device; the detected controller type is shown next to each entry (e.g. COM3 — GRBL or /dev/cu.usbmodem… — Pololu Tic).
For GRBL boards, choose the baud rate that matches your firmware (typically 115200). Pololu Tic controllers connected over USB do not use a baud rate.
A small label below the combobox confirms the auto-detected type:
Detected: GRBL
or
Detected: Pololu Tic
2. Connect / Disconnect
Click Connect to open the connection. LinFIR probes the controller and updates the detected type if needed. A status indicator appears to the right of the Disconnect button:
| Dot colour | Meaning |
|---|---|
| 🟢 Green | Connected — table idle |
| 🟡 Yellow | Table is moving |
Click Disconnect to cleanly close the serial/USB connection.
Position Dial
After connecting, a dial shows the current table angle:
- Red needle points to the current position (−180° to +180°)
- Cardinal labels: 0°, 90°, 180°, −90°
- ↻ button — sends a position query and refreshes the display immediately
The angle is updated automatically whenever the table moves or reports its position.
Manual Controls
GRBL Controllers
| Control | Description |
|---|---|
| Go to angle field + Go | Sends G1X<angle>F360 — moves to the specified angle at 360 deg/min |
| Set 0° at current position | Sends G92X0 — redefines the current position as the zero reference |
LinFIR reads the GRBL angle as the work position (machine position minus the
G92offset), so after Set 0° the displayed angle and the auto-scan targets count from the new zero, with GRBL 1.1 as with older firmware.
The Go button is disabled while the table is moving.
Pololu Tic Controllers
| Control | Description |
|---|---|
| Range — min / max steps | Defines the microstep positions that correspond to −180° and +180°. Drag-adjust or type a value. |
| Steps/° info label | Computed from the range: (max − min) / 360. Shown in grey below the range fields. |
| Go to angle field + Go | Converts the angle to microsteps using the range and sends SET_TARGET_POSITION (energizing the motor first if it isn't) |
| Set 0° at current position | Sends HALT_AND_SET_POSITION 0 — resets the current position to 0 steps / 0° |
| Energize / De-energize | Toggles the stepper driver power. The button names the action: green Energize while the motor turns freely, red De-energize while it holds. A Go energizes the motor first if needed, and the button follows. |
| De-energize motor after auto-scan | Toggle (off by default). When enabled, the motor is automatically de-energized once an auto-scan finishes returning to 0° — see Auto-Scan with a Rotation Table. |
Tic range calibration: Set the range so that the min and max step values span a full 360° rotation. For example, if your Tic is configured for 200 steps/rev × 16 microsteps = 3200 steps/rev, use −1600 to +1600 for ±180°.
Workflow: Manual Polar Measurement
If you prefer to position the table by hand and measure angle-by-angle without auto-scan:
- Connect the table in Settings → Rotation Table.
- Open the IR Management window for a driver.
- Use Go to angle to move the table to the desired off-axis angle.
- Set the Measurement angle field in the IR window to match.
- Click 🎤 Measure to capture.
- Repeat for each angle.
For a fully automated workflow, see Auto-Scan with a Rotation Table in the Sweep Measurements documentation.
Tips and Best Practices
- Set zero before scanning — use "Set 0° at current position" with the speaker pointing directly at the microphone, so 0° = on-axis.
- Always capture on-axis (0°) first — LinFIR requires a 0° reference before allowing off-axis measurements. If 0° is in the scan range it will be measured first automatically.
- Use a timing reference — for accurate phase relationships between angles, configure an Electric (loopback) or Acoustic timing reference in Audio Settings. This is critical for Directivity Analysis.
- Keep the mic at constant distance and height for all angles.
- Note where the rotation axis is relative to the front baffle (depth, and any sideways offset): if it isn't at the baffle, enter those offsets under the measurement lists of the IR Management window - see Rotation Center Correction.
- 10° step or finer gives good sonogram and DI resolution. 5° is ideal.
- For the Pololu Tic, calibrate the step range carefully: a wrong range shifts all angle positions.
Troubleshooting
| Symptom | Likely cause | Fix |
|---|---|---|
| No port detected | Device not connected or driver missing | Plug in, install drivers, click away and back to refresh |
| "Auto-scan: rotation table timed out" | Table didn't reach target in 30 s | Check wiring, reduce load, increase motor current |
| Table moves but angle stays 0° | Tic range is 0 (min = max) | Set correct min/max steps in Settings → Rotation Table |
| GRBL: table doesn't respond to "Go" | Wrong baud rate | Try 9600 or 115200; match your firmware setting |
| Linux: "permission denied" on connect | No access to the USB / serial device | See Linux: device access below |
| Auto-scan skips some angles | Those angles already have a measurement | Delete existing measurements at those angles first |
Linux: device access
Linux only lets a program open a USB or serial device if a rule allows it. The LinFIR packages (.deb, .rpm) install a rule that lets the person using the computer open both controllers, the Pololu Tic (USB) and GRBL (USB serial, /dev/ttyACM* or /dev/ttyUSB*): there is nothing to do.
With the AppImage, open Settings → Rotation Table and click Allow the controllers: LinFIR asks for the administrator password and installs the same rule. The controllers already plugged in can be used right away.
To install the rule by hand (for any copy of LinFIR):
printf '%s\n' \
  'SUBSYSTEM=="usb", ATTRS{idVendor}=="1ffb", MODE="0666"' \
  'SUBSYSTEM=="tty", SUBSYSTEMS=="usb", TAG+="uaccess"' \
  | sudo tee /etc/udev/rules.d/70-linfir.rules
sudo udevadm control --reload-rules && sudo udevadm trigger
The first line is the rule Pololu's own Tic software installs. The second gives the user of the local session access to USB serial ports; it needs systemd-logind, which almost every distribution uses. Without it, a GRBL controller needs your user in the dialout group (uucp on Arch), then a new login:
sudo usermod -aG dialout $USER
Related Documentation
- Directivity Analysis — using polar measurements for DI and sonograms
- Sweep Measurements — sweep parameters and capture workflow
- Audio Setup — timing reference configuration